Audio routing: how to use buses, auxes, sends, and returns when producing music
[ad_1]
What are the basics of audio routing?
Audio routing refers to the flow of signal in your audio setup, whether it’s a hardware rig or production software like a DAW.
In any musical context, some kind of “signal” (whether that’s sound waves, electrical signal, or digital ones and zeroes) has to travel from one place to another.
When you play electric guitar, the signal begins at the strings of your axe, where it’s captured by the pickups on the guitar’s body. This signal (which is now electrical voltage) might then be routed to effects pedals that alter the signal. It then travels to an amplifier before being pushed into the air.
In electronic music-making setups, signal flow can get more complicated. You might think of the messy patchbays found in a well-equipped studio, or the forest of cables sticking out of a modular synth. But audio routing isn’t only relevant in the hardware realm. It’s just as crucial in software production, where it’s easy to set up smart and complex DAW signal routings.
What is routing in a DAW?
Audio routing in a DAW refers to the path that a signal takes from when it is generated to when you hear it. DAW signal routing typically starts with a sound source such as an audio file or synthesizer. Eventually it reaches the output of your DAW, where it can be sent to your speakers or headphones, or bounced to an audio file for later listening.
A lot of things can happen in between these two points. The signal might be routed through effects that transform it in creative ways. It might be grouped together with other signals, or duplicated and sent down multiple pathways.
Modern DAWs allow for almost limitless audio routing configurations. Indeed, the power to manage complex signal flows is one of the strengths of software production. Learning to master this complexity will broaden the scope of your music.
To better understand audio routing in a DAW, we need to learn some key terms, starting with “bus.”
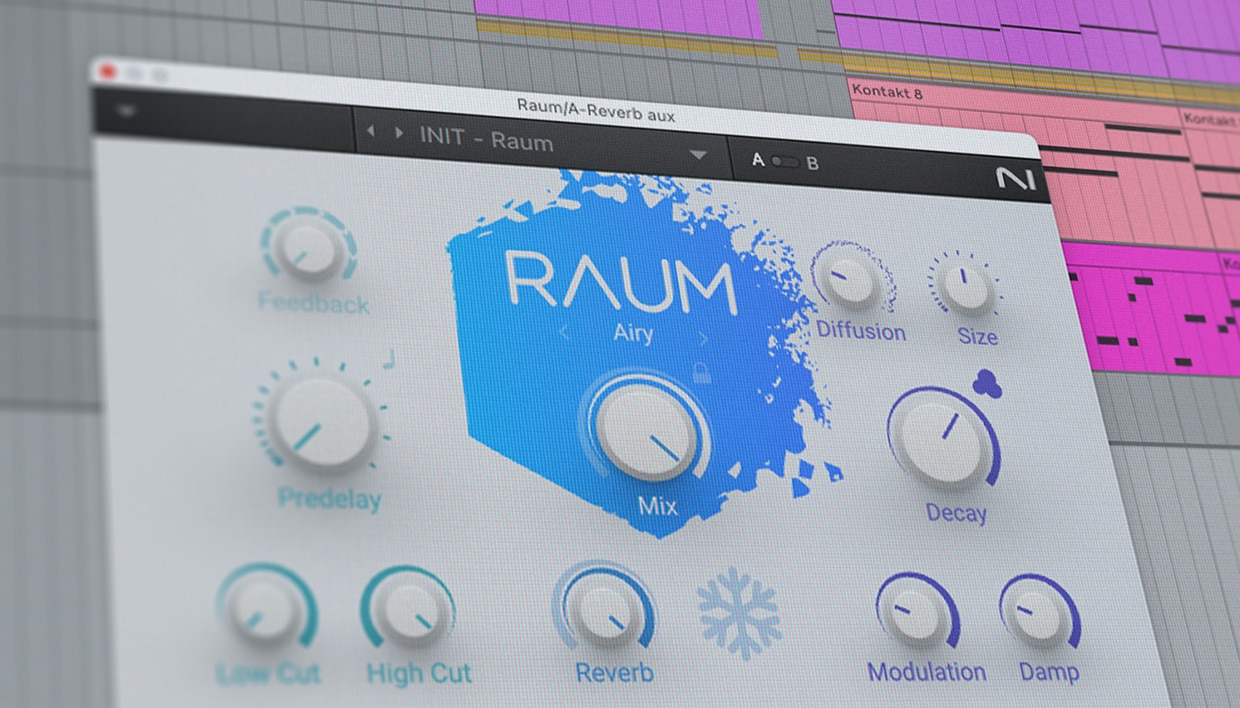
What is a bus?
A bus, or mix bus, is a channel that takes signal from multiple channels and bundles them together into one signal.
[ad_2]
Source link
50 song ideas to inspire your next masterpiece
[ad_1]
43. Use repetition
Write a catchy chorus using repetition. If you repeat the title of the song in your chorus three or more times, it gets stuck in the listener’s head.
44. Keep the lyrics simple in the chorus
Use the chorus to spotlight the main message or feature of your song, and save the verses for the story building aspects of your song.
45. Use a different tempo
Start song song writing ideas at a different tempo than you usually work at. If most of your songs are written at 70 or 80 bpm, try writing at a faster tempo like 120 or 128 bpm. If you usually write at 128, try 140 or above.
46. Repeat phrases, but change them slightly
Start a song by writing a melody with a short musical phrase, then repeat it, altering the notes or rhythm slightly each time. Try changing one note each time the melody repeats. On the other hand, you could repeat the same melody three times, and in the fourth phrase, change the notes or rhythm.
47. Access more sounds on your favorite controller
Using new sounds can be inspiring, and lead to new ideas. Now you can access a vast range of Native Instruments sounds with the new NKS Hardware Partner program, which means controllers from Akai, Novation, Mektar, Korg and M-Audio are now compatible with Komplete Kontrol desktop software. Use your favourite controller to access over 2,000 NKS-compatible instruments, and you’ll be sure to find a sound that inspires you to write something new.
48. Get inspired by your favourite artists
Listen to your favorite songs, and see if you can identify which parts of their songs that you like about their melodies or productions. Deconstruct their ideas from start to finish. Try to borrow some of their techniques, whether this means borrowing ideas like types of rhythmic patterns, scales, or themes.
49. Learn song structure
If you’re writing songs, you’ll need to have a clear idea of what each part of the song is, and a general idea of how long it should be in the genre you’re writing in. Pop music has a different song structure from electronic music. If you learn how to structure your songs, the entire song writing process will be easier.
50. Keys to success
Whether a song is in a major or minor key can have merit on its success. Choose a key to work in depending on the emotion that you want to express in the song. Major keys tend to produce happier, more upbeat songs, while minor keys add a melancholy feeling to the song.
Start writing songs with these song ideas
We all need a few new song ideas now and then to spark our imaginations and creativity. Keep this list of song writing prompts easily accessible so you can refer to them before a writing session. Choose one idea to use for your song, and get busy crafting your song!!
Be sure to download Komplete Start, a free version of Komplete that’s a great addition to any songwriter’s setup. This toolkit includes Kontakt 8 Player, which gives you access to Tools, including the Chords Tool and Phrases tool that are perfect for aspiring or seasoned writers. Equipped with these tips for starting a song, you’ll always have a fresh flow of ideas to create your music.
[ad_2]
Source link

Live 12.2 is Coming – with Bounce to New Track, New and Updated Devices, and More
[ad_1]
Ableton Live 12.2 is now in public beta. Free for all Live 12 users, the next update speeds up essential creative workflows and brings new and updated devices to all editions of Live 12 – along with a host of new features for Push, and an additional device for Move and Note.
Bounce to New Track
You can now bounce clips or time selections on any MIDI or audio track, including all processing, to a new audio track with just a few clicks – or use Bounce Track in Place to convert the whole track to audio.
Explore new and updated devices
Auto Filter has been a core audio effect since the very first version of Live – but it sounds and looks like new in 12.2. Experiment with creative filter types like Vowel, DJ, and Comb, and shape sounds with greater precision thanks to Auto Filter’s revamped modulation section, new mixing controls, and real-time visualization. Auto Filter also comes to Move and Note for the first time.
Roar, Live 12 Suite’s flexible saturation and modulation machine, adds a new Delay routing mode and Dispersion filter type, plus an external audio and MIDI sidechain – allowing you to play the pitch of the feedback in Note mode.
Meld’s new Chord oscillator lets you play chords from a single MIDI note with four sawtooth waves. Adjust or modulate the chord shape and inversion, and keep everything in key with Meld’s scale awareness. The synth also gets a new Scrambler LFO effect.
Spectral Resonator and Resonators now support Live 12’s scale awareness and tuning systems.
Search, tag and browse more easily
Live’s Browser has been redesigned to help you find and organize your content more efficiently. The new Quick Tags panel lets you view, edit and assign tags directly in the Browser. The Filter View has been simplified, and its hidden features have been made more discoverable.
You can customize the look of any label and user folder in your sidebar with a range of new icons, and the Browser lets you view multiple columns of metadata at once.
For more details, head to the Live 12.2 beta release notes*.
What’s new for Push?
Live 12.2 brings major new creative features to Push. Expressive 16 Pitches lets you make melodies spanning multiple octaves from your drums and one-shot samples, with added fine control from Push’s MPE-enabled pads.
You can now structure songs, perform Sets, and explore flexible ways of sequencing clips and scenes on Push, with Follow Actions.
Fine-tune the timing, feel, and even the tonality of your music, with full access to the Groove Pool and Live 12’s Tuning Systems, plus Bounce to New Track directly from Push.
And in addition to the all-new Expressive Chords and the updates to Auto Filter, Meld, and Roar, Live 12.2 brings the External Audio Effect device to Push – enabling you to use hardware audio effects wherever you like in your Push Set.
For a full list of what’s new for each version of Push, see the release notes for the Live 12 beta on Push*.
If you own a Live 12 license, you can sign up for the Ableton beta program* to try the new features now.
*Note: Release notes and the Ableton beta program are only available in English
[ad_2]
Source link
Laidback Luke on why FM synthesis keeps shaping dance music
[ad_1]
Start using FM8 in your electronic music
Once again, we want to give a special shout-out to Laidback Luke for coming on and talking about the history of FM synthesis and why now is the perfect time to start embracing this method of sound design. It might seem intimidating at first, but it’s nowhere near as complicated as it looks.
FM synthesis is having a huge resurgence, whether it’s the donk-style sounds in techno and house or the iconic Reese bass, which is everywhere from drum and bass to house, tech house, and beyond.
This sound is defining the moment, and there’s no better time to start using tools like FM8 to recreate these tones. Laidback Luke shared a ton of workflow tips, his go-to presets, and the parameters he tweaks most when dialing in sounds.
Check out FM8 below, and once again, a huge thanks to Laidback Luke. Don’t forget to stream his latest track, It Clicked, out now on Dim Mak Records. Add it to your playlist and share it – because this guy is a living legend, and everything he touches in the studio is absolute gold.
[ad_2]
Source link
Why it works: Dissecting the production moves that brought Keinemusik’s “All I Got” to the top of the charts
[ad_1]
1. Subtle textures that keep you hooked
One of the key strengths of “All I Got” is its background movement – textures and subtle details that fill out the sound without overwhelming the mix or distracting from the main elements. A combination of white noise sweeps and percussive sounds, both small and not-so-small, creates a sense of movement just below the surface, evolving subtly as the track progresses.
Keinemusik keeps these background elements subtle, prioritizing the atmosphere they create rather than drawing direct focus. This approach rewards repeat listening – these textures may not be immediately apparent, but they add a tension and depth that makes the track compelling. This adds replay value, as listeners notice something new each time.
Komplete’s Replika XT plugin is excellent for creating similar dynamic background elements. Replika XT emulates analog-style delays and modulation, creating textures that are both rich and natural. The analog characteristics of this delay add a nuanced, driven sound that contributes to the track’s backdrop without overtaking it.
Pro tip: Use the Lo and Hi Cut parameters to control where the delay sits in the mix. Cutting higher frequencies can help blend the delay into the track’s background, especially for detailed elements. Automating these cuts can help the delay weave in and out of focus at key moments.
[ad_2]
Source link
10 of the weirdest instruments of all time
[ad_1]
Some musicians are content working with familiar, time-tested instruments that deliver predictable but reliable results. Others, however, push beyond convention. They seek to make sounds that could never have been heard before. Over time, musicians and instrument makers have experimented with new materials and designs that sometimes lead to groundbreaking inventions, and sometimes make oddities that push the boundaries of what we consider music to be.
These weird instruments challenge our way of thinking about music-making. Some have found their way into mainstream music, but others remain niche curiosities that are waiting to be explored by adventurous composers and music producers.
In this article, we’re diving into ten of the weirdest instruments ever created. Some are steeped in tradition, and others are futuristic experiments. All of them show how far musicians will go in the pursuit of new sounds.
Jump to these sections:
Add some of these sounds in your music using Komplete 15, a music production bundle that has everything you need to make the music that matters to you.
Creating weird instruments: musicians as innovators
The need for new sounds is a constant in music. As genres evolve, we as artists and producers look for fresh ways to capture our artistic visions. Sometimes, we simply want to surprise our audiences. That’s why we can spend hours creating the perfect synth patch, why orchestral composers experiment with extended techniques, and why some experimental musicians build custom instruments from scratch.
Some of the most famous innovations in music history started as strange, niche ideas. The electric guitar, the synthesizer, and the drum machine were once considered radical departures from traditional instruments. Today, they define entire genres.
Let’s take a look at some of the most unique instruments of all time.
[ad_2]
Source link
DJing the WNBA, scoring E! documentaries, and designing fashion show soundscapes: A conversation Vicky Casis
[ad_1]
Vicky Casis is a multi-talented artist who threads the worlds of DJing, production, and visual media with her signature sound. From spinning at major events like the WNBA Championship to crafting beats for documentaries and fashion shows, Vicky creates soundscapes for a variety of cultural moments and events.
We recently had the opportunity to chat with her about her multi-faceted career, her creative process, and her advice for aspiring producers.
You’re involved in a variety of projects, from DJing major events like the WNBA Championship to performing live Maschine+ beat sets and co-creating QSTV. How do you balance these different aspects of your career?
Time management is very important for me. I take a lot of mental notes, plan events on my iPhone notepad, and try my best to use my calendar more often. I’m still working on managing time better, but I do my best!
Does your experience DJing influence your production style, or vice-versa?
My production style and DJ style are actually a bit different because I like to blend all different types of genres and sounds together. My production style is more hip-hop based, but currently, I’m looking to get into more dance production, and what is inspiring me to do so is spinning anything that gets the people moving.
You’ve worked on hip-hop documentaries like “Contact High” and the “Black Pop” TV special. How does the process of creating music for visual media differ from composing for your own releases?
Creating music for visual media is a bit different from composing my own releases because there is a template from the team on how they want different scenes to sound. The music coordinator may have an idea of what sounds they want conveyed for a scene, and from there I build on that idea. When making original music, my mind is clear of what to create. I never really have an idea of what type of track to create; I usually build off of listening to Maschine sound libraries, sound packs, and/or samples.
“Casis World” features a variety of artists, much like your “Baby Gurl” EP. What do you enjoy most about collaborating with other musicians, and how do you select the artists you work with?
What I enjoy most about collaborating with other musicians is bringing out what’s special about these musicians on a record, as well as experimenting with new fresh ideas and sounds that may be new for them and myself. I like to select artists that I know are willing to get out of their comfort zone and can deliver what is needed for the track or project.
A lot of people I collaborate with are either good friends of mine or musicians that I’ve discovered from other friends or social media.
You’ve had success integrating music production into the fashion world with your work for Marissa Wilson NY. Can you talk about the connection between music and fashion, and how you approach creating music that complements a visual aesthetic like a fashion show or campaign?
Music and fashion go hand and hand for me, whether it’s music played in a clothing store or music played during a runway show. Creating the right soundtrack to complement a show or campaign can help elevate the story of what the designer is trying to convey.
The amazing thing about Marissa is that she always knows what she wants, and she always has references for me to build from. We’ll brainstorm and send ideas to each other until she’s satisfied with what I create. It’s always a joy to collaborate with Marissa and to create music for her runway shows/campaigns.
Can you share a couple of your favorite Maschine features that have helped you create your music?
One of my favorite features on Maschine is the Clips feature. With Clips, I’m able to edit and create on the fly without any interruptions. The amount of plugins and sound libraries in Maschine are out of this world. When I want to get experimental between different genres and/or instruments, I’m capable of finding whatever I need to execute a beat.
Being able to use external VSTs like Serato Sampler, Serato Hex FX, Splice, and more is awesome. I have no limits to finding the right sounds to create and mix.
And using my Maschine+ for beat sets is always great. I can load in beats on each pad/group and use different FX during a beat set on the Maschine+ like a SP404 to create an experience for a live beat set.
What advice would you give to aspiring producers, especially those interested in creating music for various types of projects like you have in your career?
Some advice I would like to give is to never limit yourself because music is needed in all different mediums. Learning the music business and learning from stories of those that had bumpy experiences in music is important. Finding your community or creating your own community is needed.
There’s a beat scene in many cities in the U.S. and internationally where producers curate live beat shows, beat battles, and more. Connect with like-minded individuals in music and different fields like technology, art, fashion, etc. You all can create art and events together that can inspire the world.

Is there anything else you would like to share with us?
There are new collaborative projects from myself and different artists that will be released this year and beyond! Also I would like to give a huge shout out to The QSTV squad, my family, and my daughter Valentina Rose Bryant who will be 2 years old in March! Much love.
Get inspired with limitless opportunities in music
Vicky Casis’s journey through the music industry is a testament to the power of versatility and collaboration. Her ability to adapt her skills to different mediums, from documentaries to fashion shows, showcases the numerous opportunities available to music creators today.
Vicky will be speaking at SXSW 2025 on the panel, “The Art of the Beat: Bridging Creativity and Technology alongside Native Instruments, Akai, and Zaytoven.
The post DJing the WNBA, scoring E! documentaries, and designing fashion show soundscapes: A conversation Vicky Casis first appeared on Native Instruments Blog.
[ad_2]
Source link
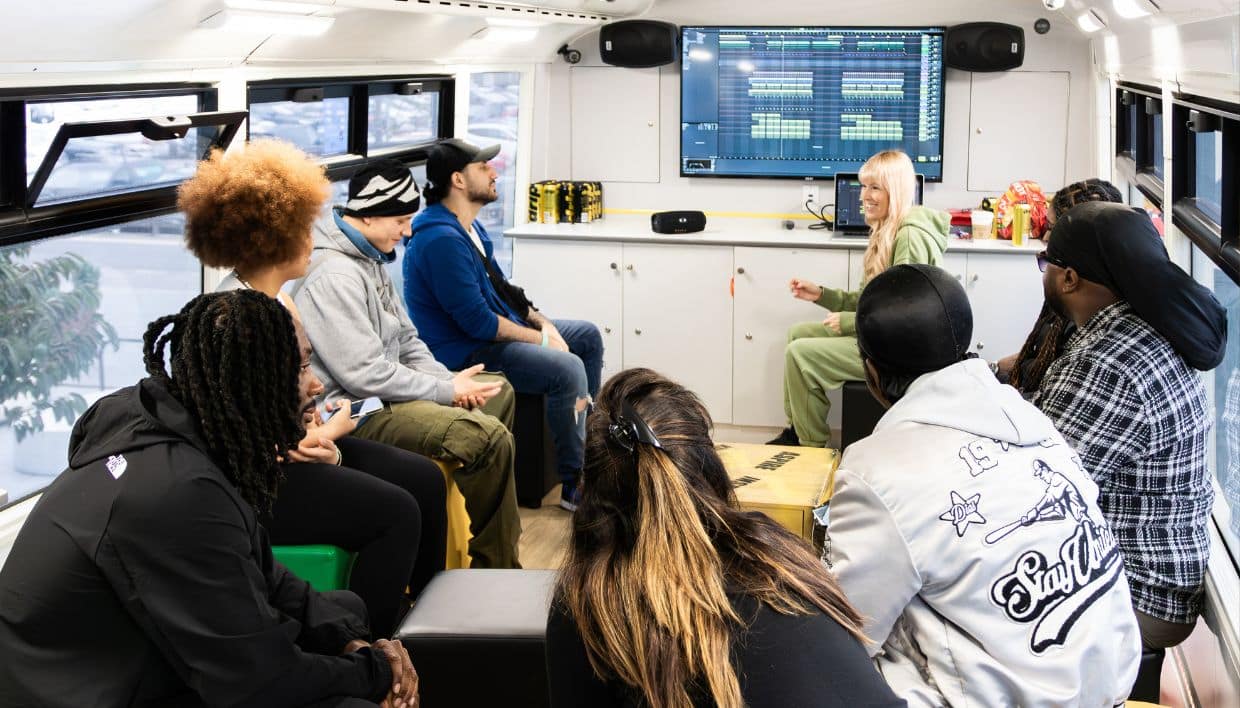
How the Young Urban Arts Foundation empowers artists with music tech and community in London
[ad_1]
Kerry, could you share a bit about your background and what inspired you to found the Young Urban Arts Foundation?
I was born into chaos at Holloway Prison, to a mother serving time. My father was deeply involved in crime and my early years were marked by instability, poverty and survival. I grew up in an environment where options felt limited and I saw how easy it was to get caught in a cycle that seemed impossible to escape.
Music became more than just an escape, it was a lifeline. It connected me to mentors, to people who genuinely cared and to a world beyond what I knew. Without those key influences, without those people who saw something in me before I saw it in myself, my story could have been very different.
I was at a crossroads. One where the wrong step could have taken me down a very different path. Instead, I was given an opportunity. There wasn’t a single defining moment but a series of moments. People, music and experiences that guided me towards something greater. One of those was my time in New York, immersed in hip-hop culture, battling, learning and seeing that there was more out there for me. That trip shifted my perspective, it made me realise that my voice had power.
That’s why I founded the Young Urban Arts Foundation (YUAF) because I know that access to creativity, mentorship and opportunity can change lives. I wanted to create the kind of support system I never had growing up. A space where young people feel seen, heard and empowered. Through our Studio Bus, we bring creativity directly into communities, offering young people a way to express themselves, heal and build self-belief.
For me, music was never just about sound, it was about survival, transformation and rewriting my story. Now, through YUAF, I’m helping the next generation rewrite theirs.
[ad_2]
Source link
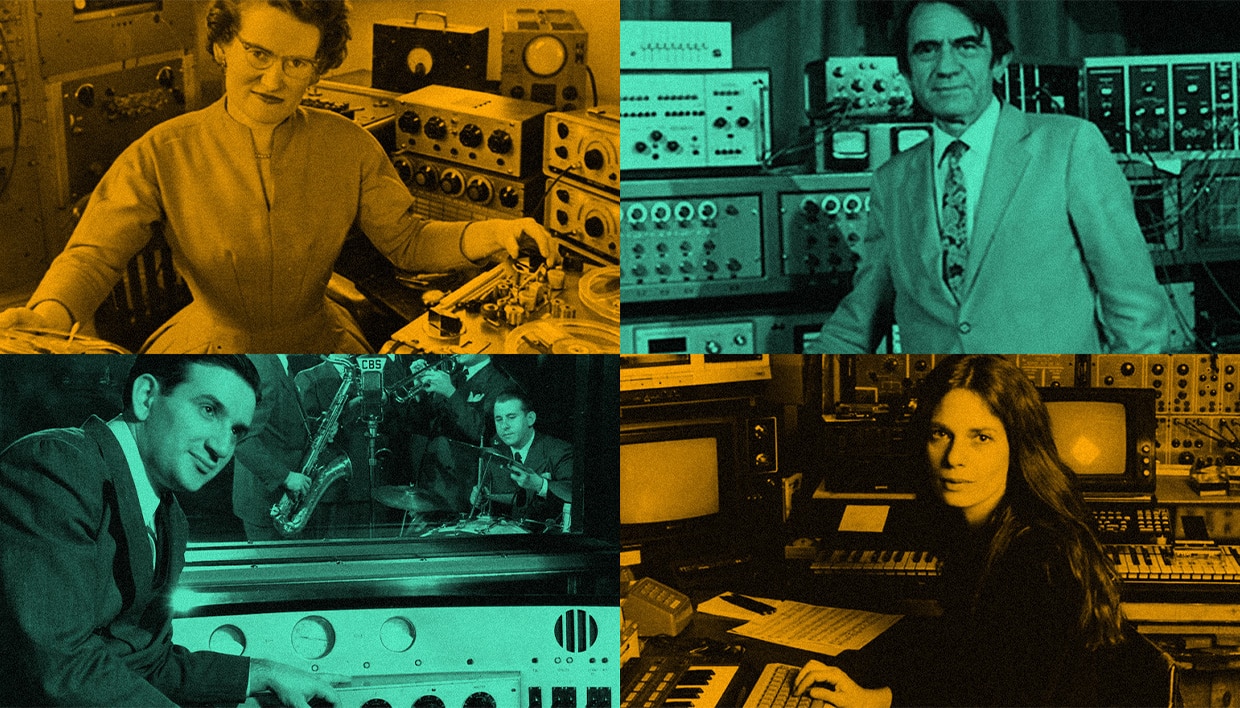
From synths to sequencers: Meet the pioneers of electronic music
[ad_1]
Daphne Oram (1925–2003) was a trailblazing electronic composer, inventor of the Oramics Machine, and a passionate advocate for electronic music as a legitimate art form. She co-founded the influential BBC Radiophonic Workshop and contributed significantly to the development of experimental sound techniques. Despite receiving an offer to study at The Royal College of Music in 1942, Oram chose to work as a Junior Studio Engineer at the BBC, where her career in electronic music began.
By the mid-1940s, Oram was composing music that combined acoustic orchestration with live electronics and turntables. She lobbied the BBC to provide electronic music facilities and began experimenting with musique concrète techniques, recording, manipulating, and looping tape sounds.
In the 1950s, her groundbreaking experiments with tape machines culminated in the creation of the BBC’s first wholly electronic score using sine wave oscillators, tape recorders, and filters. This growing demand for electronic sounds led to the establishment of the BBC Radiophonic Workshop in 1958, which Oram co-founded.
Disillusioned by the BBC’s focus on using the Workshop primarily for background music and sound effects rather than original compositions, Oram left the organization just one year after its founding. She set up her own studio, Oramics Studios for Electronic Composition, at Tower Folly. There, she explored her artistic vision more fully, composing works for radio, film, advertisements, exhibitions, and live performances. Her uncredited contributions even included sound effects for James Bond films such as Dr. No and Goldfinger.
Oram’s most notable invention, the Oramics Machine, was a revolutionary “drawn sound” synthesis and sequencing system. It allowed users to draw waveforms, pitches, and volume envelopes on film to generate sounds, embodying her innovative spirit and commitment to expanding the boundaries of electronic music. Today, she is remembered as a pioneer whose contributions helped shape the evolution of electronic music.
[ad_2]
Source link
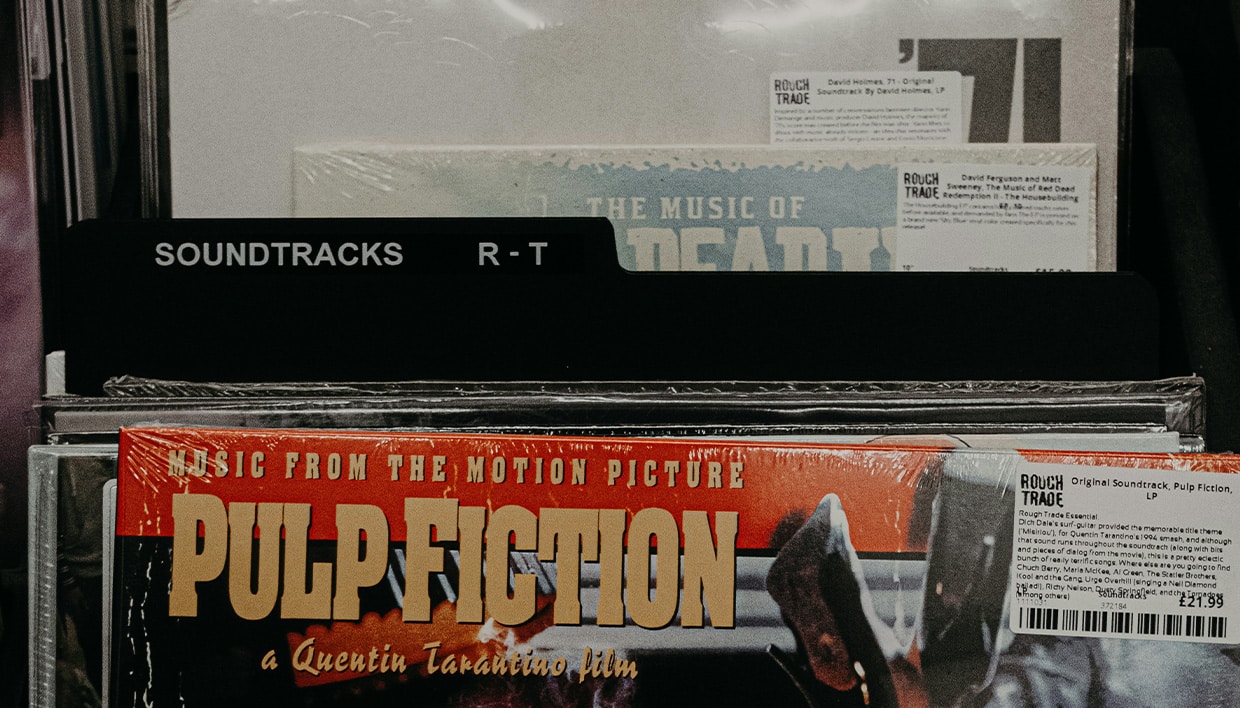
Score vs. soundtrack: understanding the difference
[ad_1]
What is a soundtrack?
In its broadest sense, “soundtrack” can mean all of the sound in a film, including music, dialogue, and foley. Some people use the term soundtrack to refer to a film’s general soundworld – not just the music.
More often, though, “soundtrack” describes the songs or compositions used in a film – especially if these songs weren’t made specifically for the film. Many films use pre-existing music, such as beloved pop songs or famous classical pieces, to evoke a certain mood or era. When we talk about this music, we’re talking about a movie’s soundtrack.
Assembling a soundtrack is often the work of a Music Supervisor, who sources the perfect music and gets it licensed for use in the film.
To make things more complicated, “soundtrack” has an extra, overlapping meaning. When the music from a film is released commercially, this release is often referred to as the soundtrack, or OST (original soundtrack).
An OST typically features music from the original score, pre-existing songs used in the film, or a combination of the two. It might also include dialogue and foley, or even music that was never featured in the film – such as a song that the director found inspiring.
The best soundtracks (or OSTs) create a pleasurable listening experience that immerses the listener in the atmosphere of the film. Different OSTs approach this in different ways.
[ad_2]
Source link