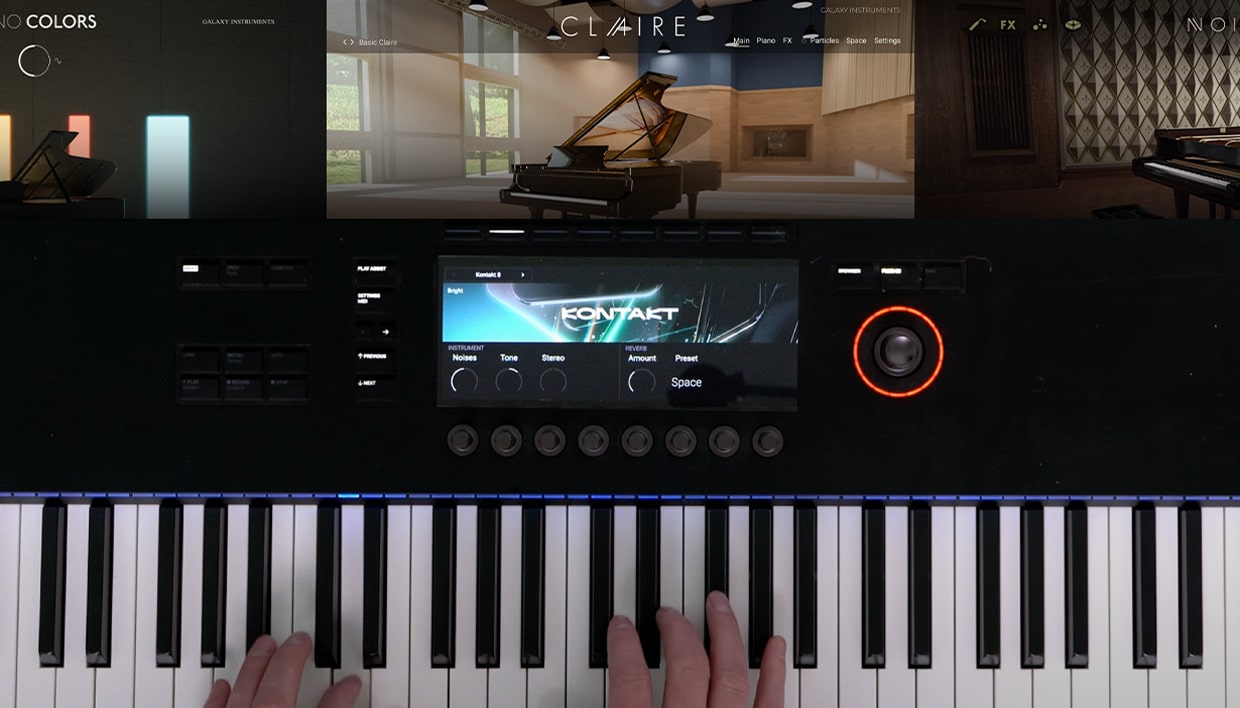
12 of the best piano plugins and VSTs from Native Instruments
[ad_1]
Bring life to your music with piano VSTs
In this article, we’ve run down 12 of the best piano VSTs available from Native Instruments. We’ve explored a selection of world-class instruments, from classical concert grands to idiosyncratic noise makers, vintage electric keys, and more. Now you have a sense of what’s out there, it’s time to find the best piano plugin for you, and start using it to bring life and expression to your productions.
If you’re not sure which piano to start with, The Grandeur is a solid choice. This state-of-the-art sampled grand piano is versatile and stunningly lifelike, making it a good option for all genres and contexts.
[ad_2]
Source link

9 music trends to look out for in 2025
[ad_1]
9. Dance music will show its soft side
Dance music has been spiraling upwards for half a decade now. Whether it’s underground clubs in Europe, big festivals in the US, or warehouse raves in South America, the sound of late night partying has been getting faster, harder, and more aggressive. Mainstay genres like techno have hit dizzying speeds, and high-energy styles like gabber, hardcore, hard house, and trance are more popular than ever.
There are a few theories as to why this music industry trend has been so long-lasting. Some argue that the pandemic left clubbers impatient and starved for adrenaline. Others point to social media: genres with big drops and heavy beats make more of an impact in the short videos that DJs and fans post online.
Whatever its source, 2025 might be the year that hard and fast gives way to slow and sensual. There are already signs of a shift. In techno, 2024 has seen the rise of “groove,” a music trend that favors subtle swing over jackhammer beats. Slower, more restrained club genres, like minimal and tech house, are on a steady rise, suggesting possible new directions for the global club scene.
It’s hard to say exactly which new sounds will break through in 2025. But if you want to make the forward-thinking club hit of the year, it might be worth notching down the tempo and exploring softer textures.
[ad_2]
Source link
How to create wide bass lines
[ad_1]
Often beginner producers are advised to keep their bass lines in mono, and while having a mono low end certainly has its advantages (not least because it will sound tighter and punchier), there are ways that you can add a touch of stereo width to your bass sounds and achieve the best of both worlds.
In this guide to creating wide bass lines we’ll show you how to make your bass more prominent and get a fuller bass sound using mid/side processing techniques. We’ll also explain what mid/side is and how it works, giving you a helpful insight into how to improve not just your bass lines, but your mixes overall.
Here are before and after examples of a mono, and widened bass line:
Jump to these sections:
- How to make your bass sound wider
- What is mid/side?
- Why is mid/side useful for producers?
- Mono compatibility
- Use Ozone Imager 2 with a bass line
- Quicker results with Ozone 11
To follow along with this walkthrough you’ll need this sample pack and a DAW, we’re going to use Ableton Live, plus the free iZotope Ozone Imager 2 plugin. We’ll also show you how to achieve the same effect more quickly with the full version of iZotope Ozone 11.
How to make your bass sound wider
You can make your bass sound wider using the Haas effect or a dedicated stereo widening plugins. However, the Haas effect and many stereo widening plugins have the same issue: they’re not mono compatible. We’ll discuss the importance of mono compatibility and show you how to achieve a mono compatible result in this guide.
1. What is mid/side?
Mid/side, sometimes known as (M-S), is an audio processing and recording technique that separates a stereo signal into two components, the mid and the side. These are derived from the stereo left and right signals that you’re probably already familiar with, and the mathematical method by which these are derived is simple enough to explain in this article.
Let’s cover the mid signal first. The mid signal represents the mono or center information of the mix, and this is the sum of the left and right signals.
left + right = mid
Most DAWs have a tool for “monoizing” an audio signal, for example Ableton Live’s Utility audio effect.
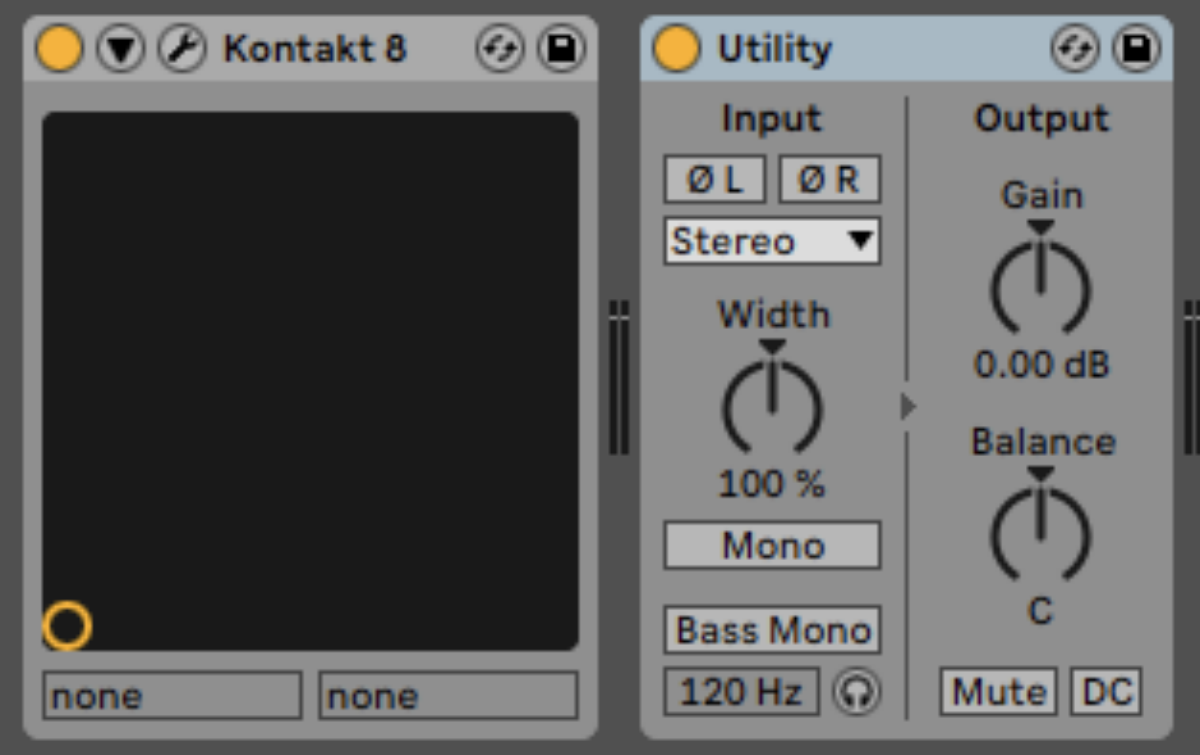
Here the Utility effect is in its default state, with the Mono button deactivated.
Here’s an example stereo audio signal running through the effect:
When the Mono button is activated, the stereo signal is converted to mono by summing the left and right channels together.
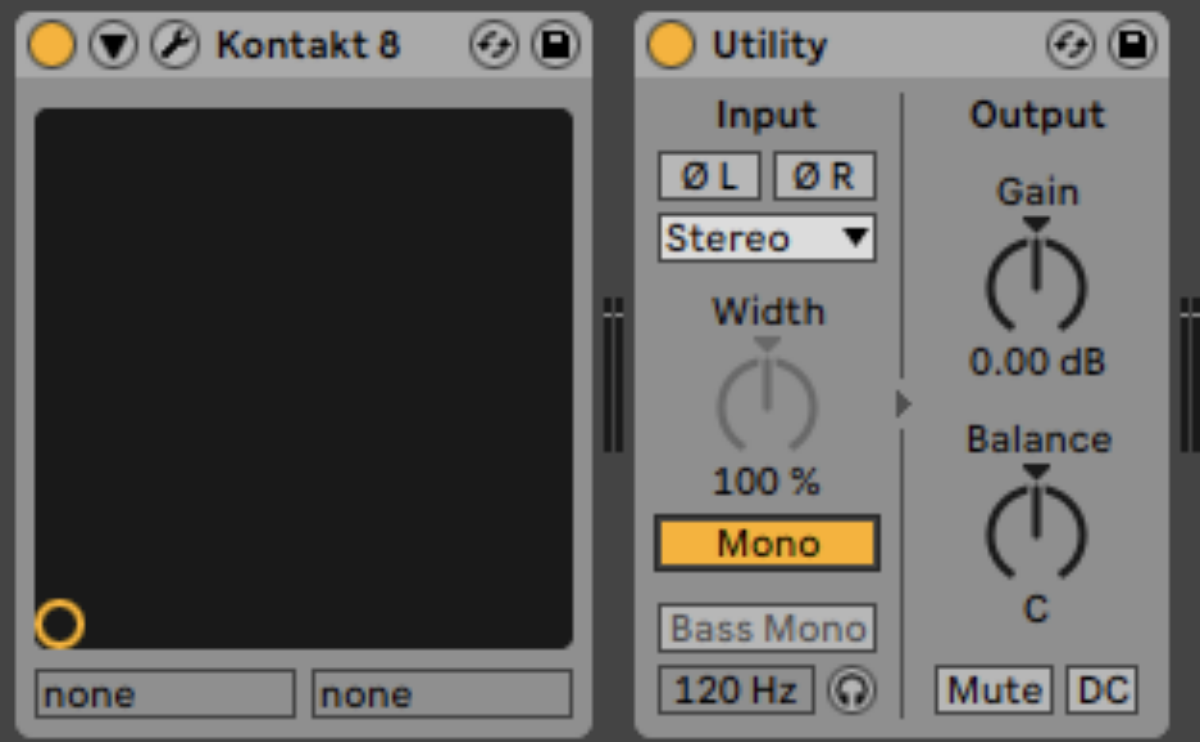
So, when the Mono button is activated we hear just the mid signal, like so:
Certain audio playback systems such as some Bluetooth speakers only have a single speaker and are therefore unable to reproduce a stereo signal. As such, it’s common for such devices to sum a stereo signal to mono so that it can be reproduced via a single speaker.
In this case, the signal’s side information is lost. Side is the other component of a stereo signal, and this is the difference between the left and right signals.
The Side signal is derived by subtracting the right channel from the left channel.
Any sounds identical in both channels (the mid signal) will cancel out, leaving only the differences, which are the stereo panned elements.
left – right = Side
Ableton Live’s Utility effect can also be used to hear the side signal. If we deactivate the Mono button, then right-click the Width knob and select mid/side Mode, we can use the Width knob to control the amount of mid and side signal in the output.
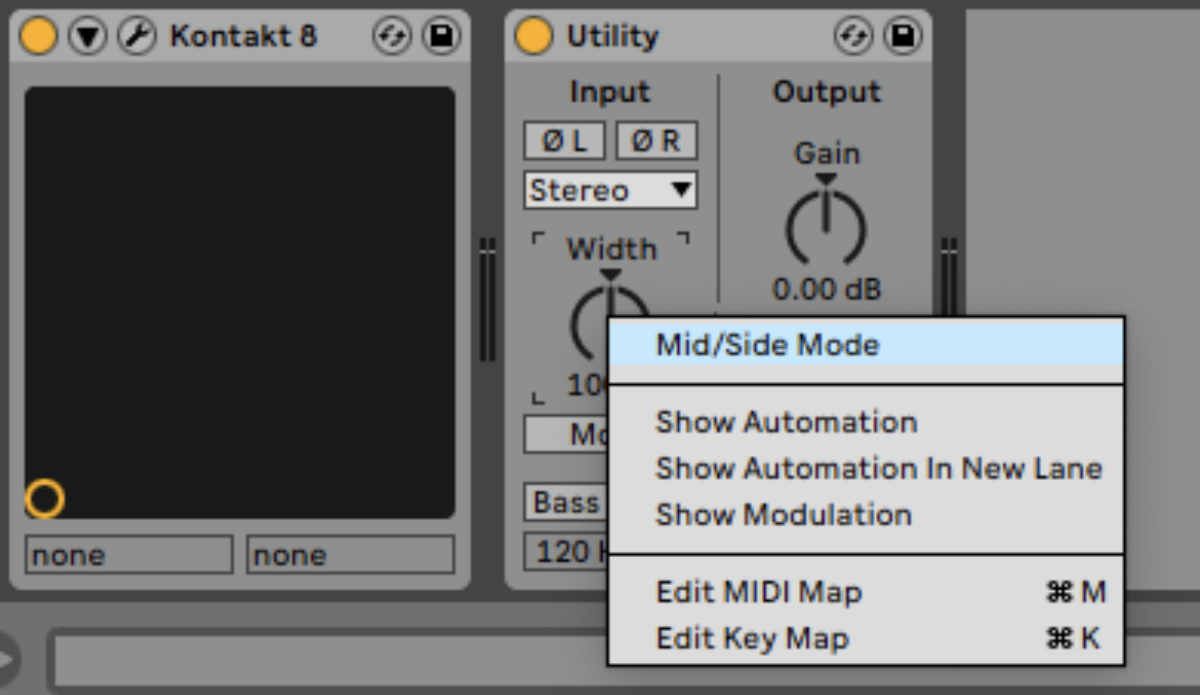
Turning the Width knob up to 100s gives us just the pure side signal.
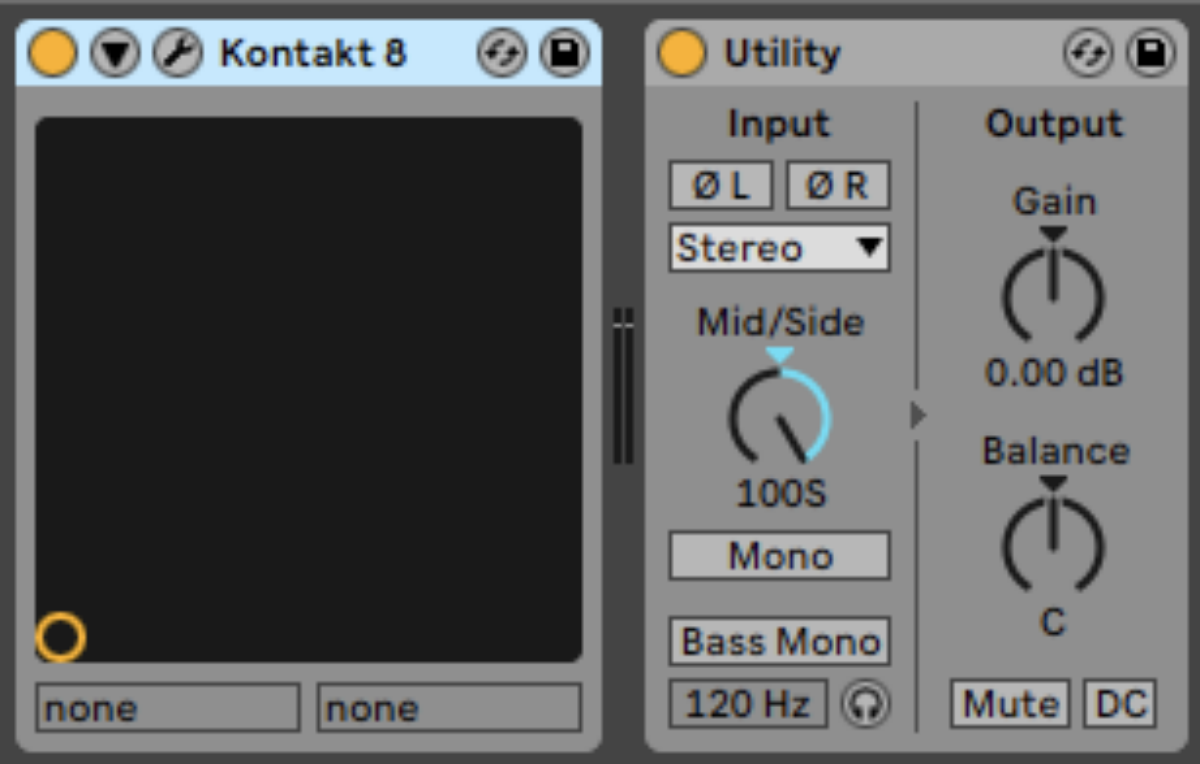
Here’s how just the side signal of our audio example sounds:
You’ve probably heard of mid/side EQ. So, what is mid/side EQ? It’s simply an EQ effect that uses mid/side processing techniques to allow the user to affect just the mid or side signal, in addition to regular stereo processing.
2. Why is mid/side useful for producers?
Thinking about, and processing a mix in terms of mid and side signals can be useful because it provides a new dimension of control over your mix’s stereo image.
Instead of treating left and right channels as fixed entities, mid/side allows you to focus on what’s in the mid versus what’s in the side, offering numerous practical and creative benefits.
For example, you can make the sides wider and more immersive while keeping the center tight and focused. Bass frequencies are typically mono to avoid phase issues, especially on club systems or vinyl. Mid/side EQ allows you to roll off low frequencies in the side channel, ensuring that the bass stays mono, and retain the stereo information in the higher frequencies, preserving the spaciousness of synths, pads, or reverb.
Mid/side processing gives you a toolkit to shape your mix in ways that wouldn’t be possible with traditional left-right stereo processing. By thinking in terms of mid and side, you can address mix challenges more efficiently, improve stereo width and depth, and craft a professional-sounding track that translates well across all playback systems.
3. Mono compatibility
Mono compatibility refers to how well the audible information and level balances of a stereo mix will be maintained when the left and right channels are combined and reproduced in mono.
For example, let’s imagine that we have a signal that’s the same in the left and right speakers, except their polarity is inverted. When these signals are summed to mono, giving us the mid signal, they will be canceled out entirely! Naturally, this is something to be avoided, especially if you’d like your music to sound right on a small playback device or club system that might be summing the left and right signals.
Many effects offer the ability to widen a stereo signal using the Haas effect, which involves applying a small delay to the left or right signal, therefore creating a bigger difference between these signals, and making the Side signal more dramatic.
The catch is that this change in phase can cause destructive interference. So, when the signals are added together they cancel each other out to some extent, resulting in a weakened signal.
Thankfully there’s a solution to this in the form of iZotope’s Ozone Imager 2, a free effect that has the ability to widen a stereo signal while maintaining mono compatibility. Naturally, this can be an extremely powerful mixing tool.
4. Using Ozone Imager 2 with a bass line
Let’s explore how to make your bass sound better with Ozone Imager 2. Begin by downloading this sample pack, and dragging the files it contains into an audio track in your DAW.

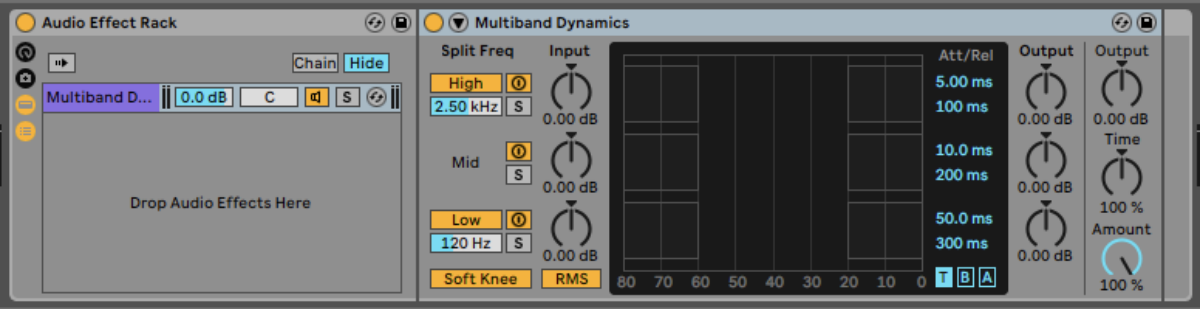
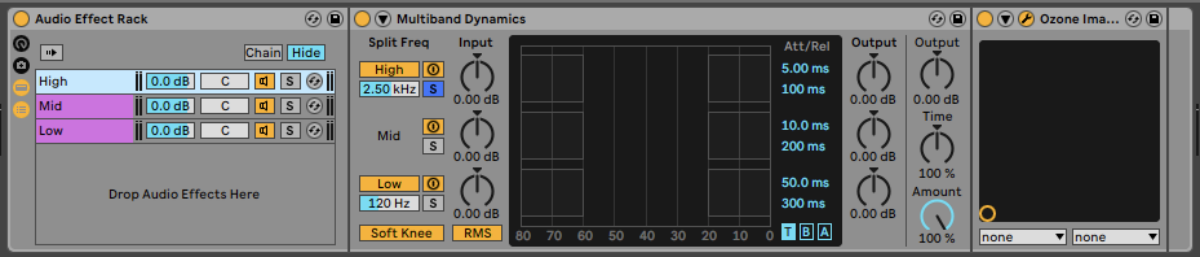
As you can hear (as long as you’re using a stereo playback device!) the keys are stereo, but the bass line is stuck firmly in the center of the mix. So, how to get a fuller bass sound? Well, let’s split the bass into three signals, one for the lows, one for the mids, and another for the highs. In Ableton Live we can use the Multiband Dynamics plugin to do this. In its default state the Multiband Dynamics plugin doesn’t actually affect the dynamics of the signal, so we can use its band-splitting capabilities for other purposes relatively easily.
First, add an Audio Effects Rack onto the audio track.and drop a Multiband Dynamics effect into it.
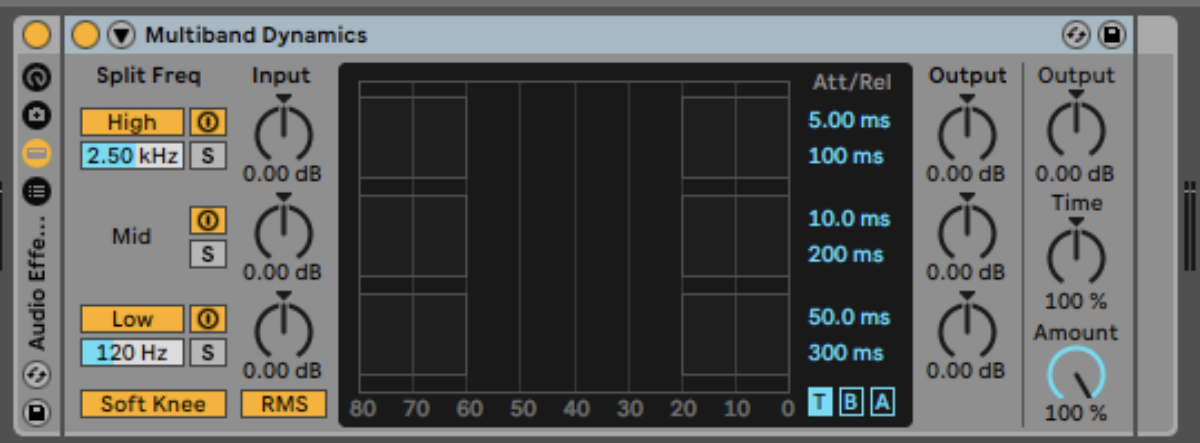
Then, click the Show/Hide Chain List button. This will allow us to create a parallel effects chain.
Now right-click the existing effects chain and select Duplicate. Do this twice to give us three effects
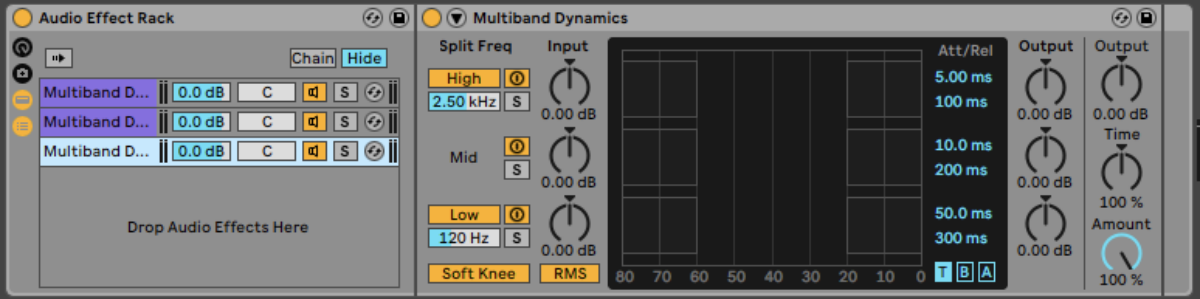
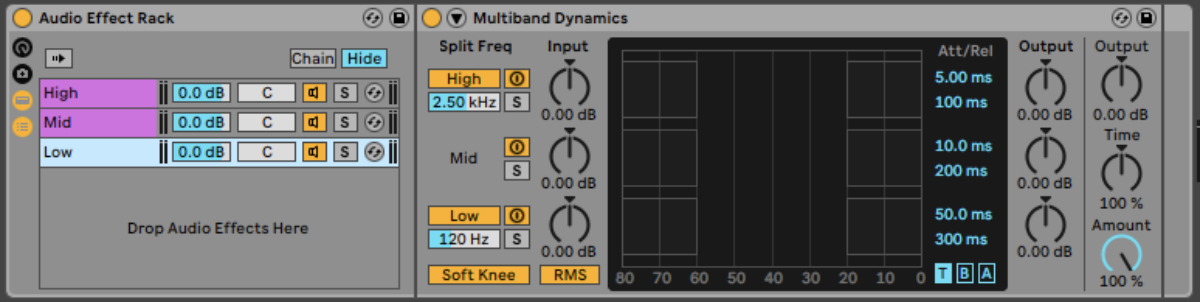
Now we have three effects chains. Let’s rename them by right-clicking on each chain and selecting Rename. We’ll call them High, Mid, and Low.
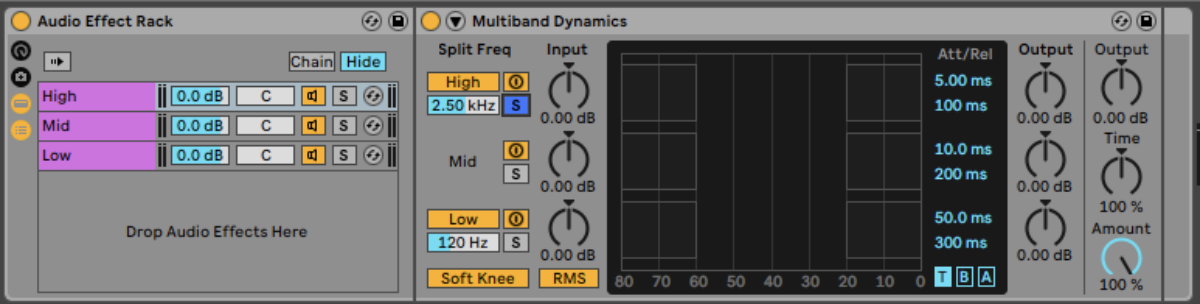
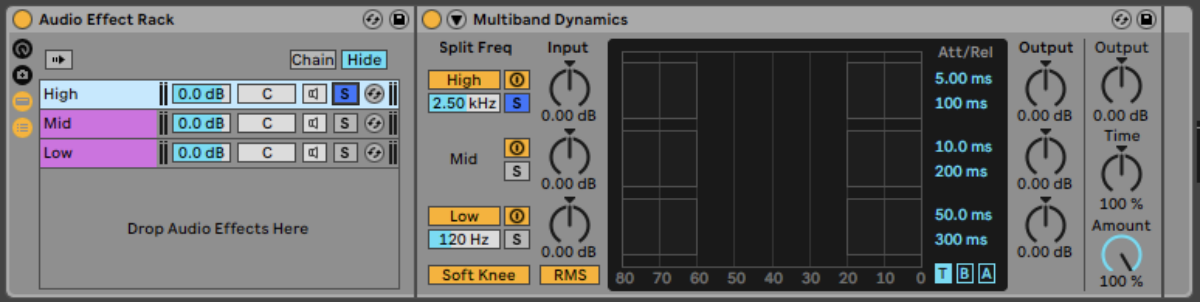
Now select the High band, and click the Solo button on the high band of the Multiband Dynamics’ Split Freq section.
Now on the Mid band, solo the mid band.

Now solo the Low band.
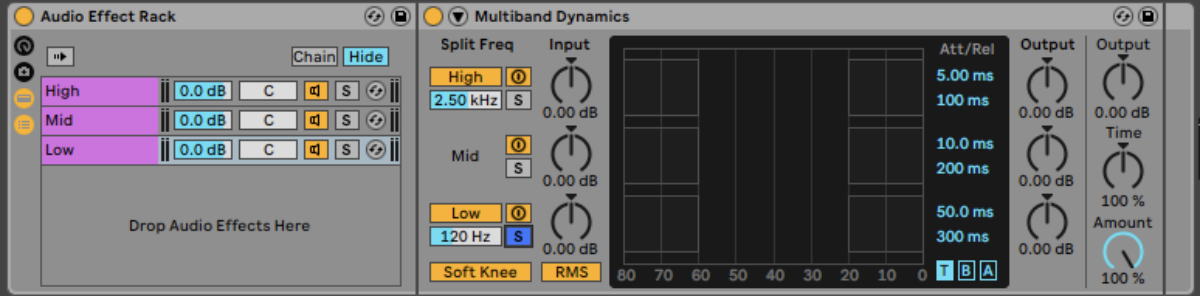
Now, we’ve split the bass line signal into three bands, and we can hear the individual bands by clicking their corresponding Chain Solo buttons in the Audio Effects Rack.
Let’s hear how those bands sound.
The High band contains very little audio information, but it’s still very much audible.
The Mid band contains a lot of audio information, but it doesn’t contain any sub bass.
The Low band contains just the sub bass.
Now un-solo any soloed bands.
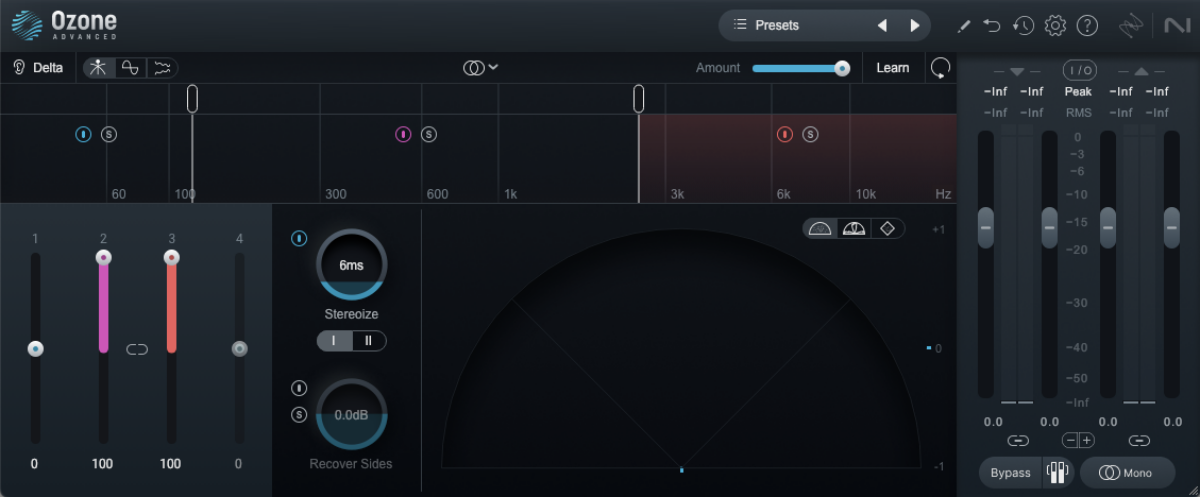
We’re going to keep the Low band mono, and just widen the Mid and High bands. The Mid band is the easiest to hear, so let’s work on that first. Add an Ozone Imager 2 effect to the Mid Band. If you play back the bass line you can see from Imager 2’s Polar Sample display that the audio signal is purely mono, indicated by the perfectly straight line at the center.
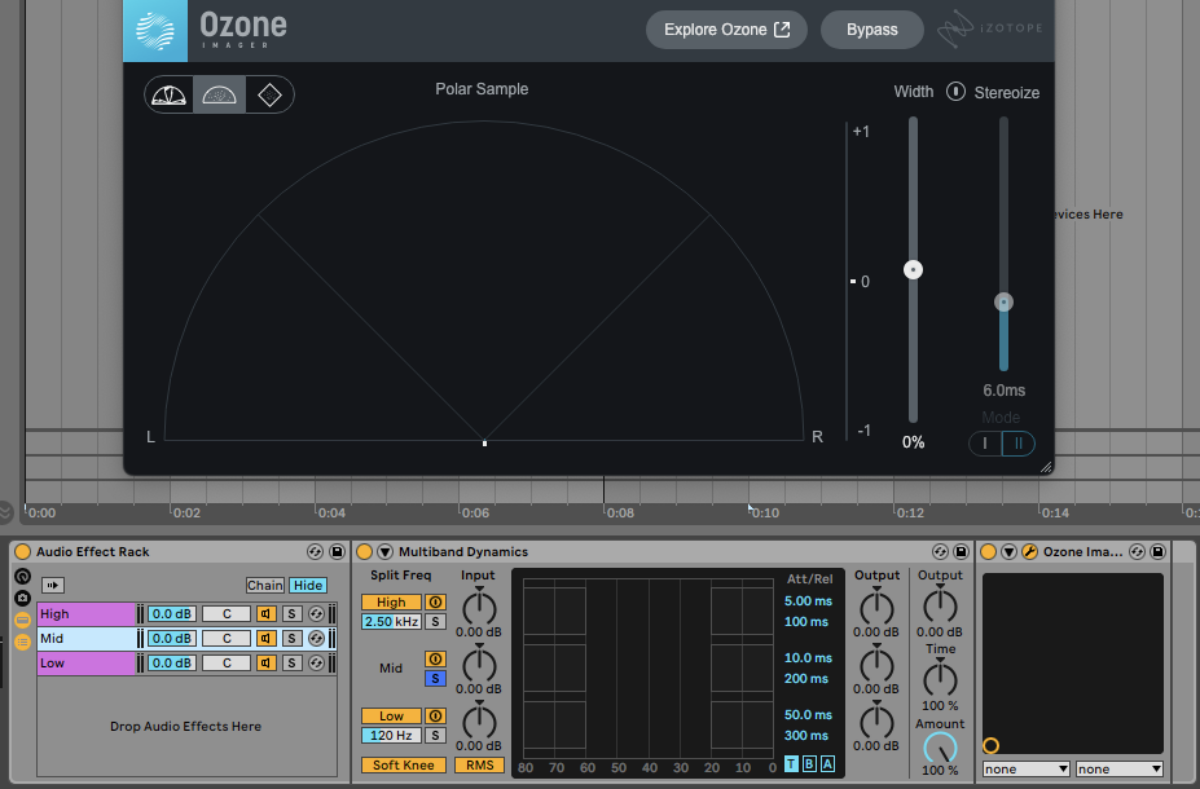
Activate the Stereoize button, and bring the Width knob up to 100%.
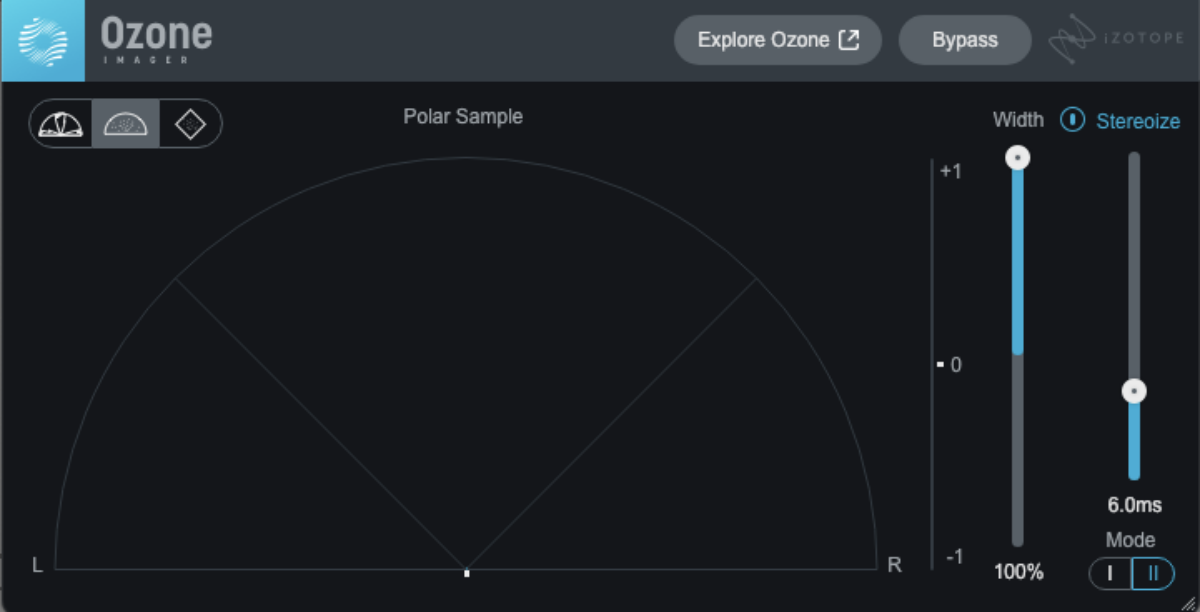
You’ll hear that this adds stereo to the sound, but it feels like it’s panned to the left.
We can remedy this by changing the Mode from II to I.
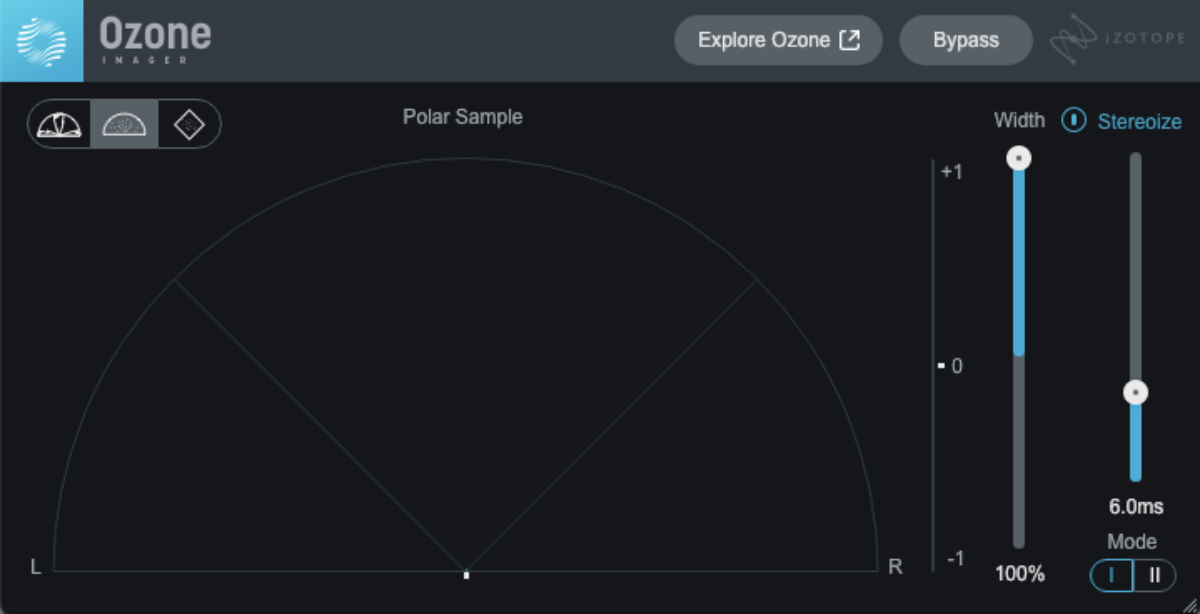
This gives us a result that fills the whole stereo panorama.
Duplicate Imager 2 onto the High band, you can do this by holding Option on MacOS or Alt on Windows, and dragging it onto the High band.
This gives us a signal that’s very wide everywhere but the Low band
Now we have our promised wide bass sound. Now let’s see how we can more quickly get the same effect with the full version of Ozone 11.
5. Quicker results with Ozone 11
Starting with the unprocessed sample pack audio, add Ozone 11 Imager onto the bass track.
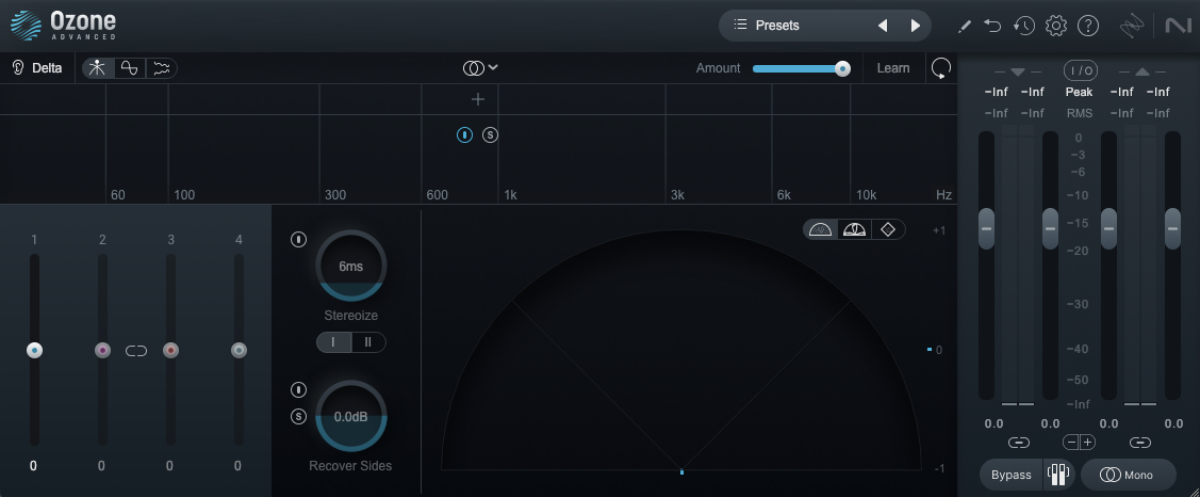
Now click the Crossover Spectrum at 120Hz and 2.5kHz to create three band splits.
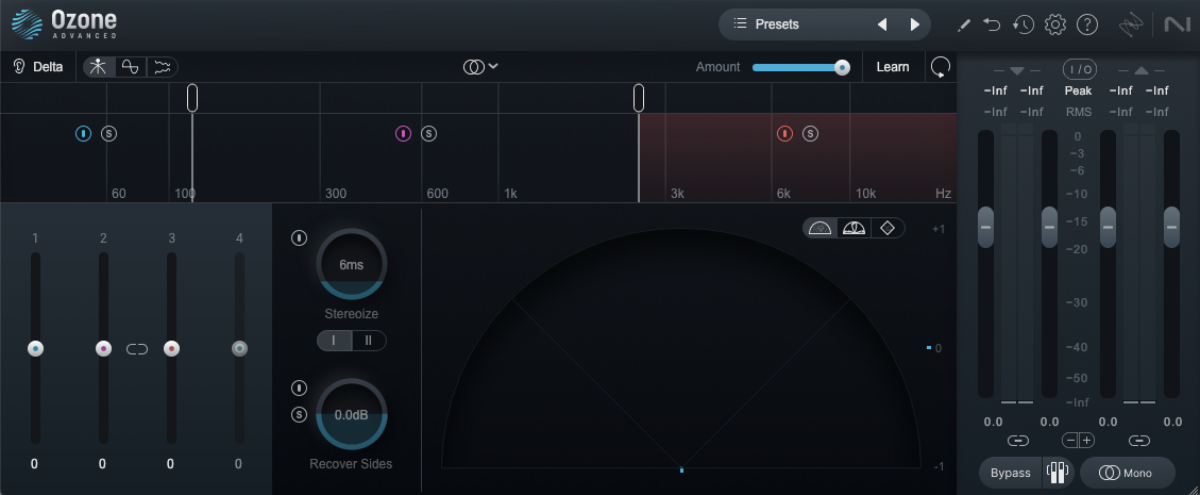
Activate the Stereoizer button, and turn the band 2 and band 3 vertical faders up to 100.
Both Ozone Imager 2 and Ozone 11 Imager give you mono-compatible results, and you can confirm this by clicking the Mono button, which sums the left and right signals to mono.
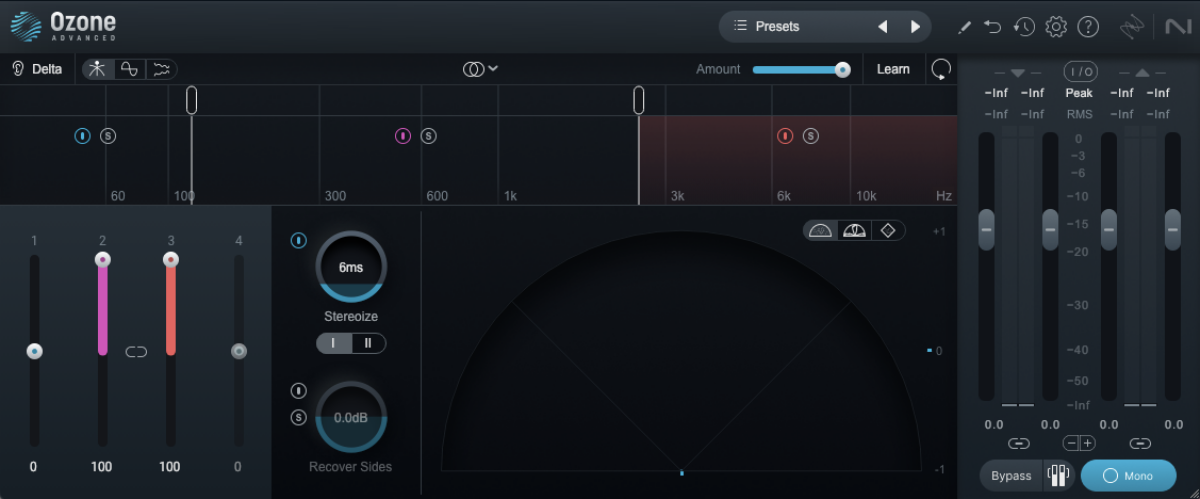
As you can hear, when the Mono button is activated this bass line returns to mono, without any phase cancellation adversely affecting it.
So, getting the same result is much quicker with Ozone 11 Imager, and it offers many more features.
Make your bass sounds wider today with Ozone
Here we’ve seen how you can get wider, more prominent bass sounds using the free Ozone Imager 2, or Ozone 11 Imager.
Ozone 11 is available as part of Komplete 15 Standard, Ultimate and Collector’s Edition. Komplete 15 is a comprehensive collection of virtual instruments, effects and sounds that gives you everything you need to bring your musical ideas to life.
The post How to create wide bass lines first appeared on Native Instruments Blog.
[ad_2]
Source link
How to customize Traktor Z1 MK2 for DJing
[ad_1]
How to customize the Z1 MK2
Customizing the Z1 MK2 allows you to use the controller in a truly personal way, and map each button on the controller to the Traktor features that you’ll use the most. By customizing the Z1 you can create a workflow that’s completely natural for you, and map the Traktor functions you need to access for performances on the buttons you want them on. The Z1 allows you to add secondary Traktor functions to the controller buttons, increasing the number of Traktor features that can be accessed.
In addition, the Z1 MK2’s colours can be customized to create a unique look and to add helpful visual cues.
Customizing the Z1 creates a natural workflow that allows you to perform your best, and create mixes in a way that’s uniquely yours. Customizing the Z1 MK2 is easier than ever using Traktor Pro 4.
In Traktor’s Preferences, there are two sections that are dedicated to customizing the main features of the Z1 MK2, and the Z1 MK2’s colours. Within a few minutes, you can easily customize the Z1 MK2 so it suits your personal style and preferences for DJing. Before you start customizing the Z1 MK2, it’s a good idea to get acquainted with the controller’s functions, so you know what the Z1 MK2 offers.
Becoming familiar with the button functions and alternative functions will allow you to think about features that will be most helpful for you to add or change. To read more about how to DJ with the Z1 MK2, check out our guide.
[ad_2]
Source link
What is modular DJing? | Native Instruments Blog
[ad_1]
The history of modular DJing
When Traktor software launched back in 2000 there were some digital DJ options out there, but its extensive features instantly put Traktor way ahead of the pack. Traktor quickly became adopted by pro DJs but back then they relied on generic MIDI controllers, painstakingly assigning everything to knobs and buttons manually. A process that was both time consuming and challenging.
So in 2003 the first Traktor modular DJ controller was born: Kontrol X1. Unlike other controllers of the time, all the labeled functions on the X1’s buttons and knobs were automatically mapped. It was an instant hit. Over two decades later, and with many developments, innovations, and additions, Traktor’s modular controllers remain a mainstay for DJs of all levels around the world.
[ad_2]
Source link
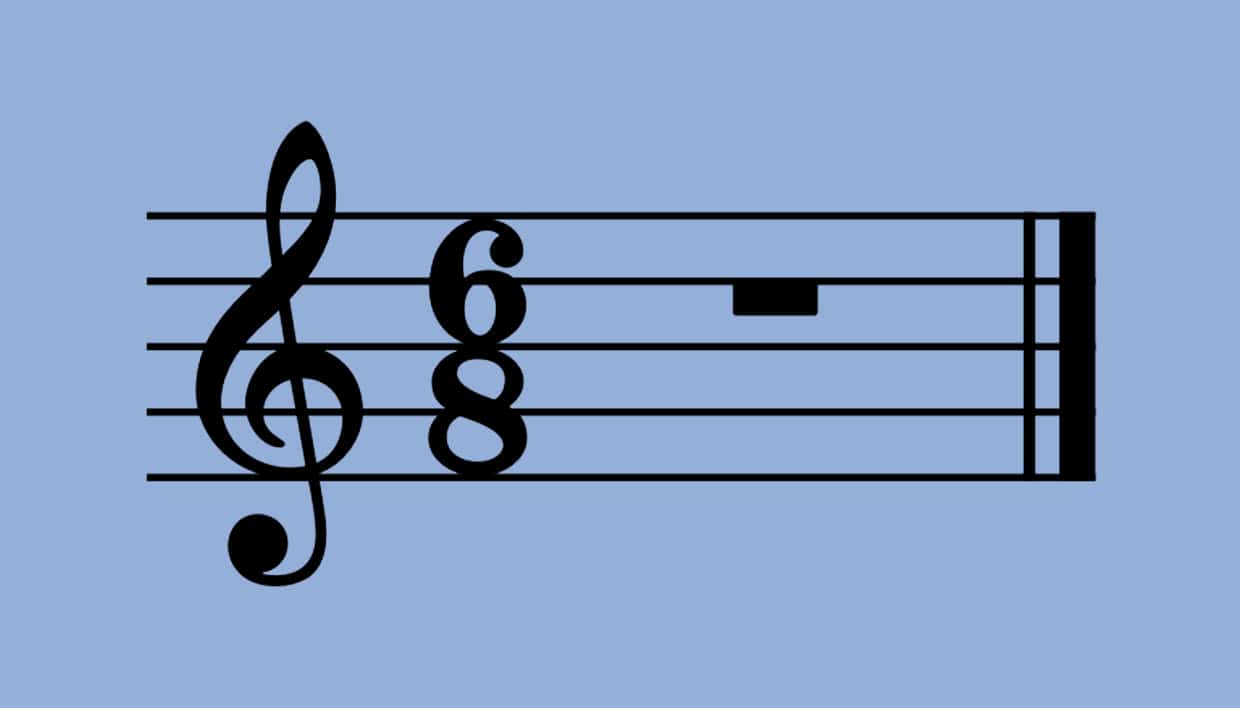
What is the 6/8 time signature?
[ad_1]
The bottom number shows the note value, and the top number tells us how many will be in a measure.
Understanding what a time signature is will be important if you want to understand 6/8 time, so read our guide on time signatures if you’d like to dive into some more detail.
6/8 time vs. other time signatures
The grouping of the 6/8 time signature sets it apart from others like 3/4 or 4/4.
The 6/8 time signature is a “compound meter”, meaning that its beats are subdivided into groups of three. The “6” in the time signature tells us that there are six beats per measure, while the “8” shows that the eighth note is the note value we are referring to. This gives the time signature its rolling or lilting feel.
Some people get confused between 6/8 and 3/4, wondering if they are the same time signature. If you’re one of those people, don’t worry. It’s a common problem. But it’s not hard to wrap your head around.
Perhaps the confusion lies in the fact that three quarter notes and six eighth notes are, mathematically speaking, the same thing. But the difference is in the way that they are grouped together.
3/4 is grouped as one set of three quarter notes per measure, which gives it a “one-two-three” waltz-like feel. On the other hand, 6/8 consists of two sets of three eighth notes per measure (or two dotted quarter notes). That’s why we call it a “compound meter”. This difference in beat grouping is what distinguishes the two, and it affects the way the two time signatures sound different.
If you want to understand the difference in more depth, check out this video:
[ad_2]
Source link
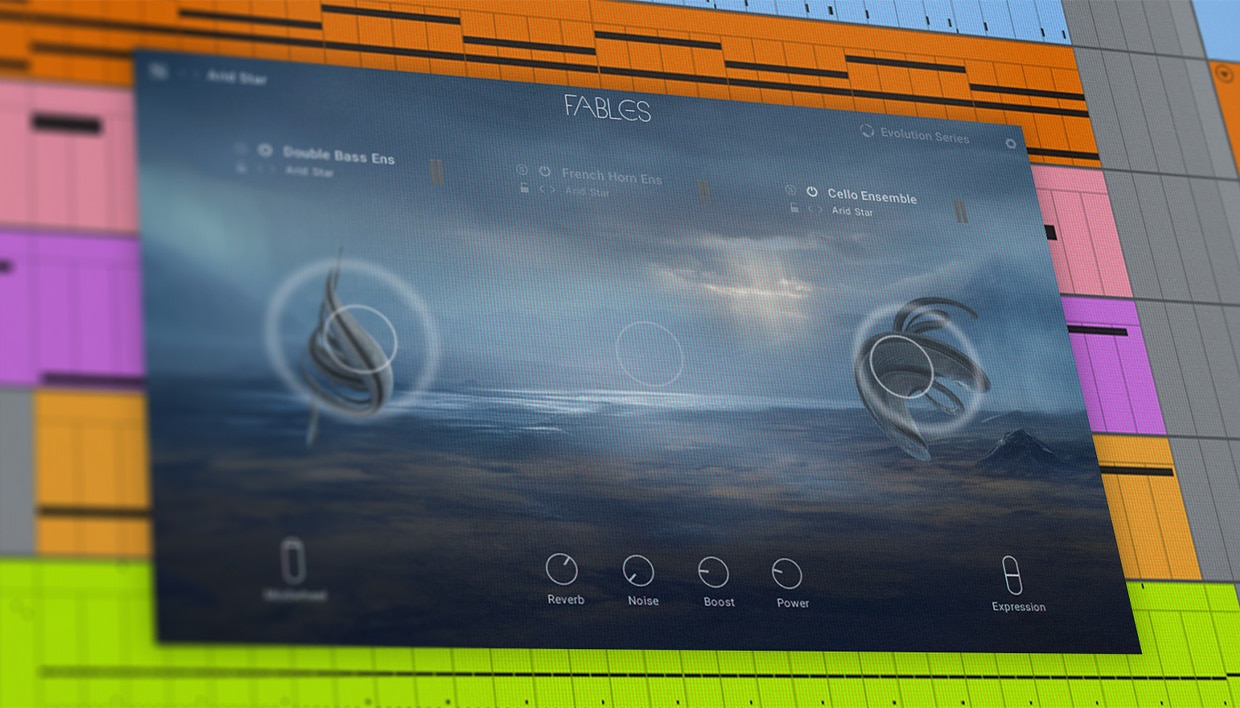
How to make a soulful score with Fables
[ad_1]
How to create soulful melodies
There’s no formula to creating a melody that one might consider “soulful,” but here are some things to bear in mind when composing melodies:
Working in an appropriate key helps, in this example we’re working in a minor key which is a good start. Keeping things relatively simple is a good idea too, and for this melody we used a two-bar pattern that repeats with a small variation the second time around. Passing tones (notes that aren’t in the chord but link one chord tone to another) and leading tones (notes a half-step below or above a chord tone) can be useful for achieving a soulful sound, though here our melody plays ostinato over the chords. Likewise, chromatic (notes outside the scale) and blue notes (flattened 3rds, 5ths or 7ths) can add a soulful touch when used judiciously.
2. Compose complimentary chords
Let’s derive some chords from our melody. Our melody includes A, C, and E notes (with the occasional B), so A minor is the natural starting point. Add another MIDI track, and this time select Velvet Strings from the list of Fables presets.
[ad_2]
Source link
A beginner’s guide to Reaktor-based synths
[ad_1]
For thick analog bass or soaring vintage leads, Monark comes custom built to deliver the richness and warmth of the classic synthesizer it was lovingly modelled after – with a few digital enhancements under the hood. The main oscillator can be set to triangle, sawtooth, ramp up, square or pulse waveforms, while two additional oscillators offer the same shapes, along with tuning up to seven semitones above or below the incoming note, allowing for a wide range of fat detuned patches and creative voicing.
The intuitive mixer section comes with a dedicated noise oscillator that can be set to pink or white, along with a filter feedback loop and dedicated load for added grit and warmth. A sumptuous filter comes in four modes, with steep resonance and a dedicated envelope, alongside a dedicated envelope in the amp section. Beautifully designed and easy to use, Monark comes with a host of additional options on the back panel. Being monophonic it can’t play chords – but excels with bass lines, leads, tuned percussion, and more.
[ad_2]
Source link
Essential audio effects and how to use them
[ad_1]
Types of audio effects
Audio effects can be broadly categorized into four types: dynamic, time-based, modulation, and harmonic effects. Each type serves a unique purpose in shaping sound.
Effects are best understood when they’re heard so we’ll be comparing sounds with effects on and off. Note that when a sound does not have any effects on it, we refer to it as ‘dry’.
1. Reverb
Reverb (which is short for ‘reverberation’) simulates the natural reflections of sound in a space. It’s the difference between hearing a singer in a small room versus a cathedral. When a recording lacks reverb, it gives us the impression that it exists in a vacuum, which can feel very unnatural. It will be flat, and feel very close to the listener. Adding a bit of reverb will create a sense of depth and dimension.
Let’s listen to what reverb can do to a clap sound. Here is the dry sample with no reverb:
[ad_2]
Source link
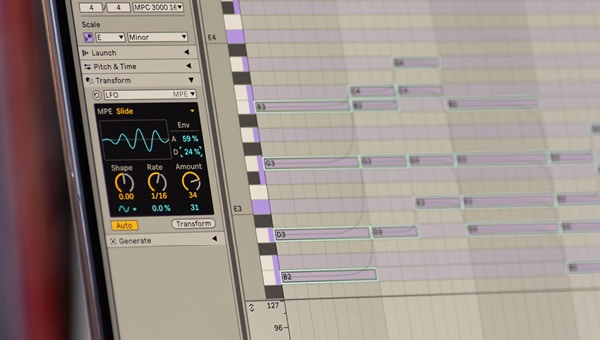
See What You Can Do With Live 12.1 – Plus What’s New for Push
[ad_1]
Ableton Live 12.1 is available now as a free update for all Live 12 users.
It brings real-time pitch correction with Auto Shift, plus Drum Sampler, new MIDI Transformations and workflows, and many more tools to try. Check out the video below to see them all in action.
See what Live 12.1 brings to Push
You can now shape dynamic sounds with finer control using Macros, switch between variations instantly, and add groove to all your MIDI clips with a single twist of an encoder. See these plus essential new workflow improvements in the video below.
Until Tuesday, December 3, you can save 25% on Live, Push, upgrades and more – head to the Ableton shop.
Take a look at the Live release notes to learn more about Live 12.1, and check out the Push release notes for more detail on the latest update.
[ad_2]
Source link